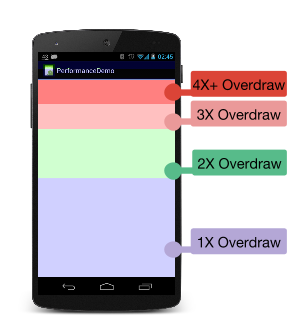
过度绘制
概念:屏幕上某一像素点在一帧中被重复绘制多次
检查过度绘制
- 可以在开发者模式下打开GPU过度绘制
- 命令行开启/关闭:
adb shell setprop debug.hwui.overdraw show/false - 使用 AndroidStudio 的LayoutInspector捕获当前页面布局,可以查看当前页面布局层级
原色(无过度绘制,即正常绘制1次)<蓝色(过度绘制x1)<绿色<粉色<红色
方法:减少布局层级、减少不必要的背景,避免过度绘制
布局优化
使用ConstraintLayout,减少布局层级
merge:减少布局层级
- 作为根布局,配合include使用
- 不能设置属性
- 使用inflate加载的时候,root不为空,且attachToRoot为true
<!--使用方法-->
<?xml version="1.0" encoding="utf-8"?>
<merge xmlns:android="http://schemas.android.com/apk/res/android">
  <Button
          android:layout_width="match_parent"
          android:layout_height="wrap_content"
          android:layout_marginLeft="20dp"
          android:layout_marginRight="20dp"
          android:text="按钮" />
</merge>
源码:
   public View inflate(XmlPullParser parser, @Nullable ViewGroup root, boolean attachToRoot) {
       ...
     if (TAG_MERGE.equals(name)) {
       if (root == null || !attachToRoot) {
         throw new InflateException("<merge /> can be used only with a valid "
                                    + "ViewGroup root and attachToRoot=true");
       }
       rInflate(parser, root, inflaterContext, attrs, false);
     }
     ...
   }
ViewStub:懒加载、按需加载
- 调用inflate真正加载布局,未加载前不可见,inflate之后会remove空View,替换真正的布局
- 不支持merge标签
- 只能inflate一次,再次inflate会抛异常
- 需要指定宽高属性
<!--使用方法-->
<LinearLayout xmlns:android="http://schemas.android.com/apk/res/android"
              xmlns:tools="http://schemas.android.com/tools"
              android:layout_width="match_parent"
              android:layout_height="match_parent">
    ...
    <ViewStub
          android:id="@+id/viewstub"
          android:layout_width="match_parent"
          android:layout_height="wrap_content"
          android:layout="@layout/layout_weather_info" />
  ...
</LinearLayout>
//代码中加载
ViewStub stub = ((ViewStub) findViewById(R.id.viewstub));
if(stub != null){
    View stubView = stub.inflate();
    TextView city = (TextView) stubView.findViewById(R.id.city);
    TextView temperature = (TextView) stubView.findViewById(R.id.temperature);
}
源码如下
//inflate替换布局
public View inflate() {
        final ViewParent viewParent = getParent();
        if (viewParent != null && viewParent instanceof ViewGroup) {
            if (mLayoutResource != 0) {
                final ViewGroup parent = (ViewGroup) viewParent;
                final View view = inflateViewNoAdd(parent);//inflate布局不add,将ViewStub的id设置给该布局
                replaceSelfWithView(view, parent);//移除ViewStub,添加布局到父布局中

                mInflatedViewRef = new WeakReference<>(view);
                if (mInflateListener != null) {
                    mInflateListener.onInflate(this, view);
                }
                return view;
            } else {
                throw new IllegalArgumentException("ViewStub must have a valid layoutResource");
            }
        } else {
            throw new IllegalStateException("ViewStub must have a non-null ViewGroup viewParent");
        }
}

private void replaceSelfWithView(View view, ViewGroup parent) {
        final int index = parent.indexOfChild(this);
        parent.removeViewInLayout(this);

        final ViewGroup.LayoutParams layoutParams = getLayoutParams();
        if (layoutParams != null) {
            parent.addView(view, index, layoutParams);
        } else {
            parent.addView(view, index);
        }
}
include
主要用于布局重用
  1. 多个include标签,需要指定id,通过id找到子view控件
  2. layout根布局和include标签id设置相同
<include
    android:layout_width="match_parent"
    android:layout_height="40dp"
    layout="@layout/layout_title_bar" />


